• Skip to primary navigation
  • Skip to main content
  • Skip to primary sidebar
  • Home
  • Nutrition
  • Recipes
  • Stories
  • About Us
  • Subscribe

Blend of Bites

menu icon
go to homepage
  • Home
  • Nutrition
  • Recipes
  • Stories
  • About Us
  • Subscribe
  • Follow us

    • Facebook
    • Instagram
    • Pinterest
    • RSS
    • Twitter
  • search icon
    Homepage link
    • Home
    • Nutrition
    • Recipes
    • Stories
    • About Us
    • Subscribe
  • Follow us

    • Facebook
    • Instagram
    • Pinterest
    • RSS
    • Twitter
  • ×

    Creamy Ninja Foodi Mac and Cheese Delight

    Posted: Mar 27, 2024 · Last updated: Mar 27, 2024 · by Shai Cohen · This post may contain affiliate links

    Jump to Recipe Print Recipe

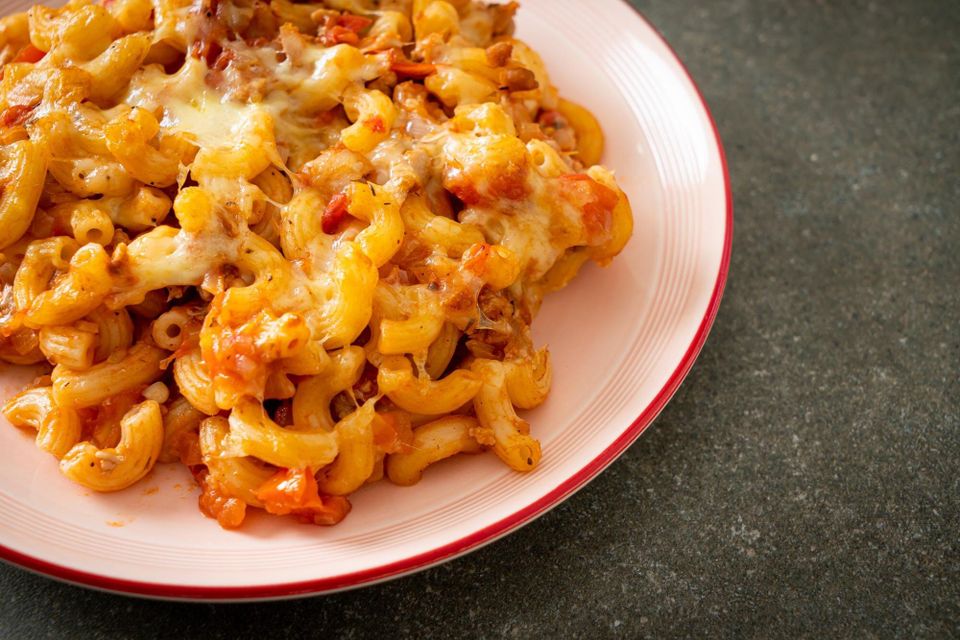
    There's a certain magic to a perfectly creamy mac and cheese that can turn any ordinary day into something special. This Creamy Ninja Foodi Mac and Cheese recipe is the result of countless experiments in my quest for that ultimate comfort food experience. I remember the first time I tried making mac and cheese in my Ninja Foodi, I was skeptical about achieving that stovetop creaminess, but to my delight, the Foodi worked wonders. The key, I discovered, was in the balance of cheeses and the cooking technique. It's a dish that's become a beloved favorite in my home, and I'm excited to share the secrets of its success with you.

    My journey with this recipe began as an attempt to streamline the traditional mac and cheese process without sacrificing flavor or texture. I initially tried using pre-shredded cheese, but quickly learned that shredding cheese fresh off the block resulted in a smoother sauce. It's a recipe I've tweaked and perfected over time, and now it's a staple in my kitchen for a quick, indulgent meal that never fails to impress.

    Jump to:
    • Ingredients
    • Instructions
    • Substitutions
    • Variations
    • Dietary Restrictions
    • Equipment
    • Storage and Reheating
    • Pro Tips
    • Creamy Ninja Foodi Mac and Cheese Delight
    • Comments

    Ingredients

    Ingredients for the recipe are prepared
    Ingredients for the recipe are prepared
    • Elbow macaroni — 1 pound, uncooked
    • Water — 4 cups
    • Unsalted butter — 4 tablespoons, cut into cubes
    • Evaporated milk — 1 can (12 oz)
    • Sharp cheddar cheese — 3 cups, freshly shredded
    • Gouda cheese — 1 cup, freshly shredded
    • Cream cheese — 4 oz, softened
    • Dijon mustard — 1 tablespoon
    • Garlic powder — 1 teaspoon
    • Onion powder — 1 teaspoon
    • Paprika — ½ teaspoon
    • Salt — 1 teaspoon, or to taste
    • Black pepper — ½ teaspoon, freshly ground
    • Breadcrumbs — ½ cup, for topping (optional)

    Instructions

    Elbow macaroni cooking in a Ninja Foodi pot
    Elbow macaroni cooking in a Ninja Foodi pot
    1. Add the elbow macaroni and water to the Ninja Foodi pot. Secure the pressure cooking lid, making sure the valve is set to 'seal.' Select the 'Pressure' function and set the timer for 4 minutes. It may seem like a short time, but trust me, it's the sweet spot for perfectly al dente pasta in the Foodi. Overcooking at this stage can lead to mushy mac and cheese, which we definitely want to avoid.
    1. Once the pressure cooking cycle is complete, carefully quick-release the pressure by turning the valve to 'vent.' Open the lid once the pin drops, signifying that all pressure has been released. At this point, you'll notice some water remains, which is normal and will help create our creamy sauce.
    1. Stir in the cubed butter until it's completely melted and evenly distributed. The residual heat will do most of the work here, so there's no need to turn on the heat just yet. Patience is key; let the butter work its magic at its own pace.
    1. Mix in the evaporated milk, cream cheese, Dijon mustard, garlic powder, onion powder, paprika, salt, and black pepper. Now, switch to the 'Sauté' function and set it to 'Low.' Stir the mixture gently until the cream cheese is fully incorporated. This step is crucial as it forms the base of your sauce, ensuring that each noodle is coated in that tangy, savory goodness.
    1. Gradually add the shredded cheddar and Gouda cheeses, stirring constantly until the cheeses melt and the sauce becomes smooth and velvety. This is where shredding your own cheese pays off; pre-shredded cheese often contains anti-caking agents that can make your sauce grainy. Take your time with this step, adding cheese slowly and allowing it to melt fully before adding more.
    1. If you're opting for a crunchy topping, sprinkle breadcrumbs evenly over the mac and cheese. Close the crisping lid and select the 'Broil' function for 1-2 minutes, or until the breadcrumbs are golden brown. Keep a close eye on it; the Foodi's broiler is quite powerful, and the breadcrumbs can go from perfectly toasted to burnt in a flash.
    1. Once done, let the mac and cheese sit for a couple of minutes. This allows the sauce to thicken slightly and the flavors to meld. Serve hot, and watch as it disappears faster than you can say 'comfort food.' A dear friend, who's a chef, once suggested a small sprinkle of smoked paprika on top before serving, and it's been my go-to ever since for that subtle smoky finish.

    Substitutions

    • Evaporated milk — If you don't have evaporated milk on hand, heavy cream is a fantastic substitute. It adds an extra layer of richness to the dish. I've tried both and can attest to the cream's ability to make the sauce even more luxurious.
    • Dijon mustard — Some may find Dijon mustard too strong. Yellow mustard can be used for a milder tang, or it can be omitted entirely. The first time I swapped in yellow mustard, I was pleasantly surprised by the subtle flavor difference it made.
    • Breadcrumbs — Panko breadcrumbs can be used for a lighter, airier crunch if preferred. I've experimented with both and found that panko offers a delightful contrast to the creamy mac and cheese.

    Variations

    • Bacon lovers — For those who can't resist a bit of meaty flavor, try stirring in some cooked, crumbled bacon before adding the cheese. It adds a smoky depth that's hard to beat.
    • Extra cheesy — If you're a cheese aficionado like me, don't hesitate to experiment with different cheese blends. A bit of blue cheese can add a sharp, tangy kick that's quite addictive.
    Creamy Ninja Foodi mac and cheese, ready to serve
    Creamy Ninja Foodi mac and cheese, ready to serve

    Dietary Restrictions

    • Lactose-free — Lactose-free milk and cheeses are readily available and can be used in this recipe to accommodate those with lactose intolerance without compromising on taste or texture.

    Equipment

    • Ninja Foodi multi-cooker
    • Cheese grater
    • Wooden spoon or silicone spatula
    • Measuring cups and spoons

    Storage and Reheating

    • Leftovers can be stored in an airtight container and refrigerated for up to 3 days. I found that the flavors meld beautifully overnight, making it even more delicious the next day.
    • For reheating, add a splash of milk and warm it on the stove over low heat, stirring frequently to prevent sticking. The microwave works too, but be sure to stir it halfway through reheating to maintain an even consistency.

    Pro Tips

    • Pressure cooking pasta — Be sure to stir the macaroni and water before pressure cooking to prevent sticking. This also ensures even cooking, so every piece of pasta is perfectly al dente.
    • Cheese melting — Always melt cheese on a low heat setting to avoid separating the fats and proteins, which can result in a greasy, unappetizing texture.
    • Resting time — Allowing the mac and cheese to rest for a few minutes after cooking will thicken the sauce and improve the flavor. It's a small step that makes a big difference.
    Creamy Ninja Foodi mac and cheese, ready to serve

    Creamy Ninja Foodi Mac and Cheese Delight

    Make your Thanksgiving unforgettable with this creamy Ninja Foodi mac and cheese recipe, a rich, cheesy comfort in every bite.
    No ratings yet
    Print Recipe Pin Recipe
    Prep Time 10 minutes mins
    Cook Time 15 minutes mins
    Total Time 25 minutes mins
    Course Main Course
    Cuisine American
    Servings 6 people
    Calories 905 kcal

    Equipment

    • Ninja Foodi multi-cooker
    • Cheese grater
    • Wooden spoon or silicone spatula
    • Measuring cups and spoons

    Ingredients
      

    • 1 pound Elbow macaroni uncooked
    • 4 cups Water
    • 4 tablespoons Unsalted butter cut into cubes
    • 1 can Evaporated milk 12 oz
    • 3 cups Sharp cheddar cheese freshly shredded
    • 1 cup Gouda cheese freshly shredded
    • 4 oz Cream cheese softened
    • 1 tablespoon Dijon mustard
    • 1 teaspoon Garlic powder
    • 1 teaspoon Onion powder
    • ½ teaspoon Paprika
    • 1 teaspoon Salt or to taste
    • ½ teaspoon Black pepper freshly ground
    • ½ cup Breadcrumbs for topping (optional)

    Instructions
     

    • Add the elbow macaroni and water to the Ninja Foodi pot. Secure the pressure cooking lid, making sure the valve is set to 'seal.' Select the 'Pressure' function and set the timer for 4 minutes. It may seem like a short time, but trust me, it's the sweet spot for perfectly al dente pasta in the Foodi. Overcooking at this stage can lead to mushy mac and cheese, which we definitely want to avoid.
    • Once the pressure cooking cycle is complete, carefully quick-release the pressure by turning the valve to 'vent.' Open the lid once the pin drops, signifying that all pressure has been released. At this point, you'll notice some water remains, which is normal and will help create our creamy sauce.
    • Stir in the cubed butter until it's completely melted and evenly distributed. The residual heat will do most of the work here, so there's no need to turn on the heat just yet. Patience is key; let the butter work its magic at its own pace.
    • Mix in the evaporated milk, cream cheese, Dijon mustard, garlic powder, onion powder, paprika, salt, and black pepper. Now, switch to the 'Sauté' function and set it to 'Low.' Stir the mixture gently until the cream cheese is fully incorporated. This step is crucial as it forms the base of your sauce, ensuring that each noodle is coated in that tangy, savory goodness.
    • Gradually add the shredded cheddar and Gouda cheeses, stirring constantly until the cheeses melt and the sauce becomes smooth and velvety. This is where shredding your own cheese pays off; pre-shredded cheese often contains anti-caking agents that can make your sauce grainy. Take your time with this step, adding cheese slowly and allowing it to melt fully before adding more.
    • If you're opting for a crunchy topping, sprinkle breadcrumbs evenly over the mac and cheese. Close the crisping lid and select the 'Broil' function for 1-2 minutes, or until the breadcrumbs are golden brown. Keep a close eye on it; the Foodi's broiler is quite powerful, and the breadcrumbs can go from perfectly toasted to burnt in a flash.
    • Once done, let the mac and cheese sit for a couple of minutes. This allows the sauce to thicken slightly and the flavors to meld. Serve hot, and watch as it disappears faster than you can say 'comfort food.' A dear friend, who's a chef, once suggested a small sprinkle of smoked paprika on top before serving, and it's been my go-to ever since for that subtle smoky finish.

    Notes

    • Pressure cooking pasta — Be sure to stir the macaroni and water before pressure cooking to prevent sticking.
     
    • Cheese melting — Always melt cheese on a low heat setting to avoid separating the fats and proteins.
     
    • Resting time — Allowing the mac and cheese to rest for a few minutes after cooking will thicken the sauce and improve the flavor.

    Nutrition

    Nutrition Facts
    Creamy Ninja Foodi Mac and Cheese Delight
    Amount per Serving
    Calories
    905
    % Daily Value*
    Fat
     
    50
    g
    77
    %
    Saturated Fat
     
    29
    g
    181
    %
    Trans Fat
     
    0.3
    g
    Polyunsaturated Fat
     
    2
    g
    Monounsaturated Fat
     
    13
    g
    Cholesterol
     
    158
    mg
    53
    %
    Sodium
     
    1309
    mg
    57
    %
    Potassium
     
    502
    mg
    14
    %
    Carbohydrates
     
    73
    g
    24
    %
    Fiber
     
    3
    g
    13
    %
    Sugar
     
    10
    g
    11
    %
    Protein
     
    40
    g
    80
    %
    Vitamin A
     
    1501
    IU
    30
    %
    Vitamin C
     
    1
    mg
    1
    %
    Calcium
     
    892
    mg
    89
    %
    Iron
     
    2
    mg
    11
    %
    * Percent Daily Values are based on a 2000 calorie diet.
    Keyword Comfort food recipes, Creamy macaroni cheese, Easy mac and cheese, Ninja Foodi mac and cheese, Pressure cooker mac and cheese
    Tried this recipe?Let us know how it was!

    Read More

    • Pimento cheese and bacon mini cheese ball bites, ready to serve
      Pimento Cheese & Bacon Mini Cheese Ball Bites Recipe for Christmas
    • Firecrackers snack, ready to serve
      Savory and Spicy Firecracker Snack Recipe for Christmas
    • Pumpkin pie martini, ready to serve
      Ultimate Pumpkin Pie Martini Recipe for Christmas
    • Polish Christmas cheesecake, ready to serve
      Authentic Polish Christmas Cheesecake (Sernik) Recipe

    Reader Interactions

    Comments

    No Comments

    Post Comment Cancel reply

    Your email address will not be published. Required fields are marked *

    Recipe Rating


    This site uses Akismet to reduce spam. Learn how your comment data is processed.

    Primary Sidebar

    Follow, Engage, Enjoy!

    • Pinterest
    • Instagram
    • Facebook
    • Twitter
    • LinkedIn
    Shai Cohen portrait

    Shai Cohen

    Blending the lessons of global culinary classes with a passion for nutritious eating, Shai Cohen offers readers a blend of delectable recipes and invaluable health articles. Here, the love of food and well-being dance together.

    More about Shai Cohen →

    Footer

    ↑ Back to top

    Newsletter

    • Subscribe

    About

    • About Us
    • Disclaimer
    • Privacy Policy
    • Terms of Use
    • Cookie Policy
    • Acceptable Use Policy
    • Sitemap

    Contact

    • Contact Us
    • DSAR form

    By using this site you agree to our privacy policy. The material on this site may not be reproduced, distributed, transmitted, cached, or otherwise used.

    Blend of Bites' content is for informational and educational purposes only. This site does not provide medical advice, diagnosis, or treatment.

    We earn fees through links to affiliate advertising program sites. We also generate income via ads.


    Copyright © 2022 Blend of Bites